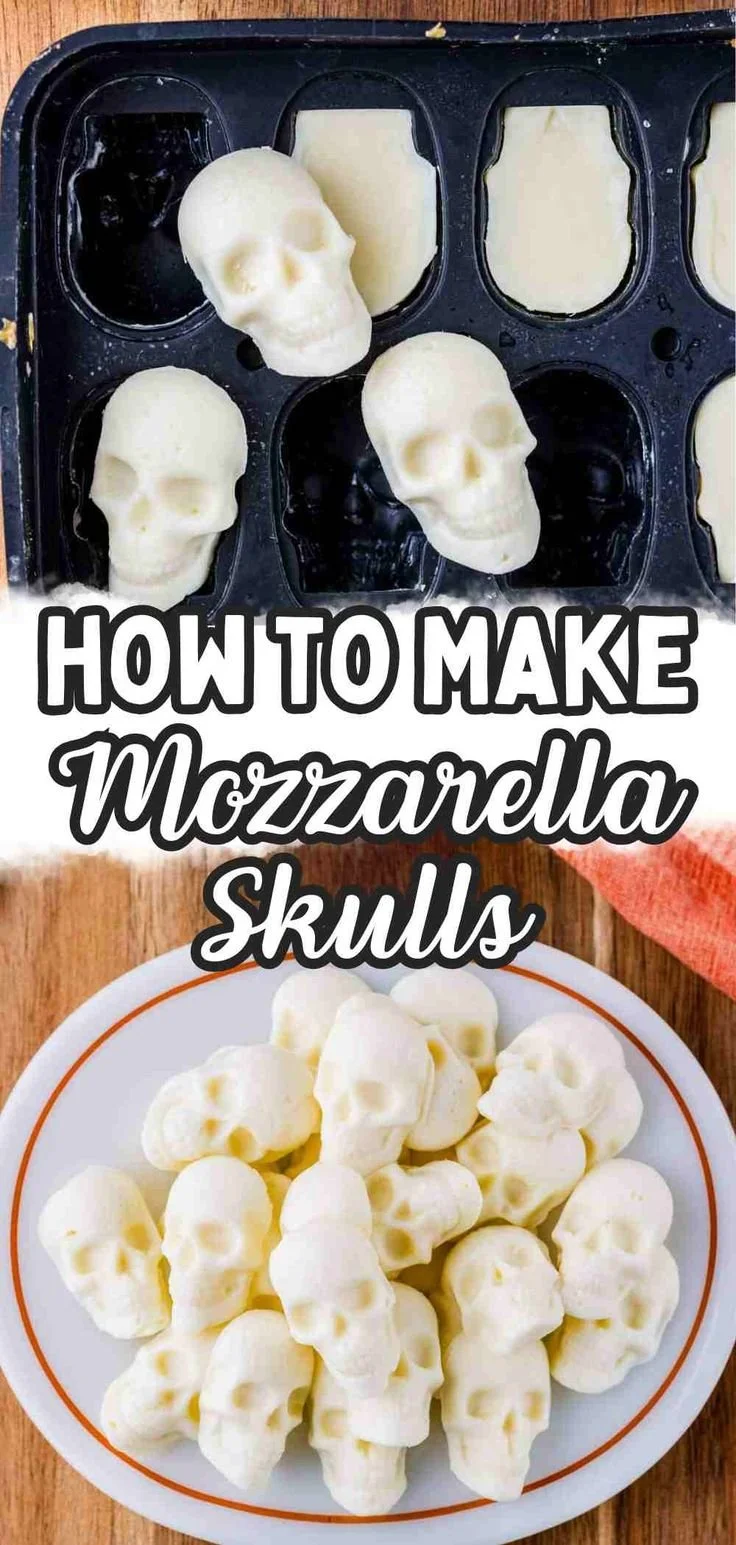
Halloween Mozzarella Skulls are a fun and creative way to add some spooky flair to your fall festivities. These cheese shapes are not only visually appealing, but they also bring a delightful burst of flavor to any dish. Whether you’re hosting a Halloween party or just want to get into the spooky spirit, this recipe is easy to make and sure to impress your guests.
Why You’ll Love Halloween Mozzarella Skulls
- Easy to Make: This recipe requires minimal ingredients and simple steps, making it accessible for all skill levels, especially newcomers to the kitchen.
- Visually Striking: The skull-shaped mozzarella brings a playful, thematic element to your charcuterie boards or salads, perfect for holiday gatherings.
- Customizable Flavor: You can easily control the seasoning and presentation, allowing you to create a cheese treat that suits your taste.
- Perfect for Entertaining: These mozzarella skulls make for a great conversation starter and add a festive touch to any fall-themed event, especially Halloween parties.
- Healthy Snacking: Fresh mozzarella is lower in calories compared to many other cheeses, allowing you to enjoy an indulgent treat that feels light.
Recipe Overview
- Prep Time: 15 minutes
- Chill Time: 30 minutes
- Total Time: 45 minutes
- Servings: 8
- Difficulty Level: Easy
Ingredients You’ll Need for Halloween Mozzarella Skulls
- Fresh Mozzarella Cheese: The main ingredient that gives these skulls their delightful texture and mild flavor. Look for high-quality, fresh mozzarella for the best results.
- Silicone Skull Molds: These molds are essential for shaping your mozzarella into spooky skulls. They allow for easy removal after chilling.
- Olive Oil: A light coating of olive oil helps prevent the cheese from sticking to the molds, enhancing flavor and texture.
- Salt and Pepper: Essential seasonings that elevate the flavor of the mozzarella. Adjust to taste.

here
How to Make Halloween Mozzarella Skulls
- Prepare the Mozzarella: Begin by draining the fresh mozzarella and cutting it into small, manageable pieces. A sharp knife makes this process easy.
- Grease the Molds: Lightly grease the silicone skull molds with olive oil to ensure the mozzarella comes out smoothly after chilling.
- Pack the Cheese: Take the mozzarella pieces and pack them into the molds. Press down firmly to ensure they hold their shape once chilled.
- Chill the Molds: Place the filled molds in the refrigerator for at least 30 minutes. This helps the mozzarella firm up for better handling.
- Remove from Molds: Carefully flip the molds to release the mozzarella skulls. Gently squeeze the molds if they stick, but be careful not to break them.
- Season the Skulls: Once out of the molds, season the mozzarella skulls with salt and pepper to taste. This enhances their flavor wonderfully.
- Serve Creatively: Arrange the skulls on a charcuterie board or top your favorite salads for a spooky Halloween presentation.
Tips for Success
- Use Fresh Cheese: For the best texture and flavor, always opt for fresh mozzarella rather than pre-packaged varieties.
- Firm Pack: Press the mozzarella firmly into the molds to prevent them from falling apart when removed.
- Timing is Key: Don’t skip the chilling step; it’s crucial for maintaining the shape of the skulls.
- Avoid Over-Oiling: A light coating of olive oil is all that’s needed; too much can affect the flavor and texture.
- Season Thoughtfully: Start with a little salt and pepper, as you can always adjust but can’t fix an overly seasoned dish.
Easy Variations
- Herb-Infused Mozzarella: Mix in chopped herbs like basil or oregano for added flavor in your mozzarella skulls.
- Spicy Twist: Add a pinch of red pepper flakes for a slight kick that brings an exciting dimension to your cheese.
- Cheese Blend: Combine mozzarella with other shredded cheeses like cheddar for a more complex flavor profile.
- Vegan Option: Use coconut-based mozzarella or other dairy-free alternatives for a plant-based version that fits within dietary restrictions.
- Chili Garlic Infusion: Drizzle some infused olive oil with garlic and chili over the skulls before serving for a bolder taste.
What to Serve with Halloween Mozzarella Skulls for Spooky Charcuterie Boards
- Crispy Crackers: Serve these skulls alongside an assortment of crackers for a crunchy contrast that complements the soft cheese.
- Seasonal Vegetables: Pair with sliced cucumbers, bell peppers, and cherry tomatoes to add fresh color and crunch to your platter.
- Fruits: Dried fruits such as figs and apricots provide a sweet balance to the savory mozzarella and enhance visual appeal.
- Nuts: A mix of nuts adds texture and richness, creating a well-rounded charcuterie experience.
- Spooky Spreads: Include hummus or olive tapenade to offer additional flavor and variety to your board.
Storage and Reheating
- Refrigerator Storage: Keep any leftover mozzarella skulls in an airtight container in the fridge for up to 3 days.
- Freezer Storage: If you want to make these in advance, you can freeze the mozzarella skulls. Just place them in a single layer on a baking sheet until frozen, then transfer to a freezer bag. They should be consumed within two months for best flavor and texture.
- Reheating: If desired, let the frozen skulls thaw in the refrigerator overnight before using. They are best enjoyed cold, but you can briefly warm them in a low oven if you prefer a softer texture.
- Meal Prep Note: These can easily be made ahead for gatherings, making entertaining a breeze.
Common Mistakes to Avoid
- Skipping the Drain Step: Failing to drain the mozzarella can lead to excess moisture, affecting texture and causing the skulls to lose their shape.
- Not Using Enough Oil: Overly sticking skulls can make removal difficult, so ensure you apply enough oil to the molds.
- Rushing Chilling Time: Allow sufficient time for chilling, or the mozzarella may not hold its shape properly.
- Improper Packing: Not packing the cheese firmly into the molds can result in skulls that break easily when removed.
- Overseasoning: Remember that it’s easier to add salt later than to fix an overly salty cheese, so start small.
Halloween Mozzarella Skulls: Background & Cultural Inspiration
Halloween Mozzarella Skulls reflect the growing trend of creative, festive foods during the Halloween season. The practice of shaping food into playful forms is not only fun but serves to engage guests in a light-hearted way. Historically, Halloween has been celebrated with various foods that evoke spookiness and festivity, often including symbols of death and darkness. These mozzarella skulls honor that tradition while providing a delicious and healthy option for modern gatherings. Incorporating fresh, wholesome ingredients and minimal processing aligns with a contemporary approach to party foods, making them suitable for both adults and kids.
Frequently Asked Questions
Can I use other types of cheese?
While mozzarella works best for these skulls due to its mild flavor and texture, you can experiment with other cheeses like gouda or provolone for a different taste.
How long can I store the mozzarella skulls?
Stored in an airtight container, they can last up to 3 days in the refrigerator. If frozen, they can maintain quality for about two months.
Can I make these in advance?
Yes! These mozzarella skulls can easily be prepared a day or two ahead of your event. Just store them in the fridge until you’re ready to serve.
What should I do if the mozzarella is too soft?
If you notice that your mozzarella is too soft, try chilling it for an additional 15-30 minutes to help firm it up further before removing it from the molds.
Can I add other flavors or ingredients to the mozzarella?
Absolutely! You can mix in herbs, spices, or even chopped vegetables for an extra layer of flavor. Just be cautious about adding too much moisture.
Final Thoughts
Halloween Mozzarella Skulls are a delightful way to add a unique touch to your Halloween festivities. With their simple preparation and fun presentation, they’re a hit for both kids and adults alike. Whether you’re hosting a party or just want to elevate your cheese game, this recipe is definitely worth making. Enjoy the creativity of bringing a bit of fun to your kitchen!












