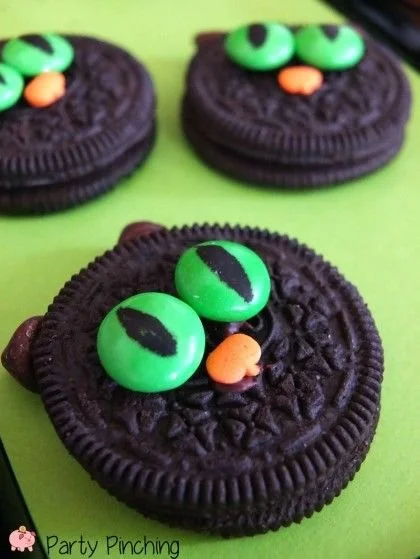
If you’re looking for a sweet treat that’s perfect for Halloween, these Oreo Halloween Treats will delight both kids and adults alike. With their spooky black cat theme, they add a fun twist to classic cookies you already love. This recipe is easy to make and a fantastic way to enjoy a festive snack or dessert at your Halloween celebrations.
Why You’ll Love Oreo Halloween Treats
- Simple and Quick: With minimal ingredients and easy instructions, these treats come together quickly, making them perfect for last-minute party preparations.
- Fun for All Ages: Decorating these spooky treats is enjoyable for kids and adults, allowing everyone to get creative and personalize their snacks.
- No-Bake Goodness: There’s no baking involved, which means less hassle and cleanup, making it a great choice for busy parents or beginner cooks.
- Customizable Designs: You can easily adjust the decorations to fit other themes, making these treats versatile for various occasions, like birthday parties or holiday celebrations.
- Deliciously Indulgent: Combining the rich flavors of Oreos with creamy fillings creates a satisfying dessert that’s sure to please any sweet tooth.
Recipe Overview
- Prep Time: 20 minutes
- Cook Time: 0 minutes (No baking)
- Total Time: 20 minutes
- Servings: 12 treats
- Difficulty Level: Easy
Ingredients You’ll Need for Oreo Halloween Treats
- 12 Oreo cookies: The base of the treat. You can use regular or double-stuffed Oreos depending on your preference.
- 1 cup chocolate melting wafers: Use black or colored melting chocolate for coating. This gives the treat a nice shine and a rich chocolate taste.
- Candy eyes: These are essential for creating the cat’s face. You can find them in the baking aisle or online.
- Black licorice laces: For crafting the whiskers and ears.
- Optional sprinkles: Use Halloween-themed sprinkles to add an extra festive touch.

How to Make Oreo Halloween Treats
- Prepare the Station: Set up your workspace with all the ingredients, melty chocolate, and a tray lined with parchment paper.
- Melt the Chocolate: In a microwave-safe bowl, melt the chocolate melting wafers in 30-second intervals, stirring in between until completely smooth.
- Coat the Oreos: Dip each Oreo into the melted chocolate, using a fork to lift it out, allowing excess chocolate to drip off. Place them on the parchment-lined tray.
- Decorate with Eyes: Before the chocolate sets, place two candy eyes on top of each Oreo to form the cat’s eyes.
- Add Licorice Whiskers: Cut the black licorice into small pieces to create whiskers. Stick them into the chocolate on each side of the face.
- Shape Cat Ears: Use additional licorice or cut little triangles out of the licorice to form ears and place them on top of the Oreos.
- Let Set: Allow the chocolate coating to harden completely. You can place them in the refrigerator for about 10-15 minutes to speed up the process.
- Serve and Enjoy: Once set, your Oreo Halloween Treats are ready to be enjoyed!
Tips for Success
- Chocolate Melting: Ensure you don’t overheat the chocolate; melting in smaller intervals works best to prevent burning.
- Setting Time: If you’re in a hurry, a brief stint in the fridge can help speed up the hardening process without compromising texture.
- Handling Oreos: Be gentle when coating the Oreos to prevent them from breaking.
- Personal Touch: Encourage kids to add their favorite candies or sprinkles for personalization.
- Storage: Keep the leftover treats in an airtight container to maintain freshness.
Easy Variations
- Different Cookies: Swap Oreos for another chocolate cookie like Hydrox or any store brand for a unique flavor.
- Nut Butter Dipping: For a healthier twist, dip the Oreos in melted dark chocolate mixed with almond or peanut butter for extra creaminess.
- Add Pumpkin Spice: Incorporate pumpkin spice seasoning into the chocolate for a seasonal flavor.
- Colorful Coating: Use colorful melting chocolates to create cheerful variations for other holidays.
- Add Coconut Flakes: Sprinkle sweetened coconut flakes on the chocolate before it sets for a different texture.
What to Serve with Oreo Halloween Treats
- Milk: The classic pairing enhances the sweetness of the Oreos and balances flavors.
- Hot Chocolate: A warm drink complements the treats perfectly, especially during chilly Halloween nights.
- Popcorn: A bowl of Halloween-themed popcorn adds a crunchy contrast and makes for a fun snack combo.
- Fruit Skewers: Fresh fruit can offer a refreshing balance to the richness of the chocolatey treats.
- Caramel Apples: A whimsical pairing, these offer both sweetness and a different texture experience for guests.
Storage and Reheating
- Refrigerator Storage: Store the Oreo treats in an airtight container in the fridge for up to a week.
- Freezer Storage: You can freeze the chocolate-coated Oreos for up to two months. Wrap them tightly in plastic wrap and place them in a freezer-safe container.
- Reheating: These treats are best enjoyed cold or at room temperature. Avoid reheating as it can affect the texture of the chocolate coating.
- Meal Prep Note: These treats are perfect for preparing ahead of time for parties or family gatherings.
Common Mistakes to Avoid
- Overheating the Chocolate: Always melt chocolate slowly to avoid burning it; it should be just melted, not bubbling.
- Not Letting Set: Be patient and allow enough time for the chocolate to set. Rushing this can lead to messy treats.
- Not Using Parchment Paper: Skipping this step can make these treats stick to the plate and break when you try to remove them.
- Skimping on Decorations: Get creative with decorations! The more personalized they are, the more appealing they look for Halloween gatherings.
- Ignoring Texture: Make sure not to dip the Oreos when the chocolate is too hot, as it can make them soggy.
Oreo Halloween Treats: Background & Cultural Inspiration
Oreo Halloween Treats draw inspiration from the playful spirit of Halloween itself, a time celebrated for creativity, costumes, and sweet delights. The tradition of trick-or-treating emphasizes the joy of receiving sweets, making themed treats like these a natural fit. Inspired by black cats often associated with witchcraft and folklore, these treats combine fun with flavor, allowing everyone to indulge in a little whimsy. Plus, using Oreos—a beloved classic—ensures these treats will be well-received, connecting generations through nostalgic flavors and festive fun.
Frequently Asked Questions
Can I use different colors for the chocolate coating?
Yes! You can use any color of melting chocolate to create fun, themed treats for any holiday or celebration.
How do I store leftover treats?
Store them in an airtight container in the refrigerator for up to a week, or freeze for up to two months in a freezer-safe container.
Can I make these ahead of time?
Absolutely! These treats can be made a day or two in advance, making them perfect for parties.
What type of candies can I use for decoration?
Any small candies like mini chocolate chips, M&M’s, or candy corn can be used for decoration, letting you customize your treats.
What if my chocolate doesn’t coat smoothly?
If your chocolate is too thick, thin it out by adding a small amount of vegetable oil to achieve a smoother consistency.
Final Thoughts
Oreo Halloween Treats are a fun and easy way to celebrate the season. With their playful design and rich, chocolatey flavor, they’re sure to be a hit at any gathering. Whether you’re enjoying them with family, friends, or at a Halloween party, these treats bring joy and creativity to the table. So gather your ingredients, invite your friends into the kitchen, and let the spooky fun begin!












