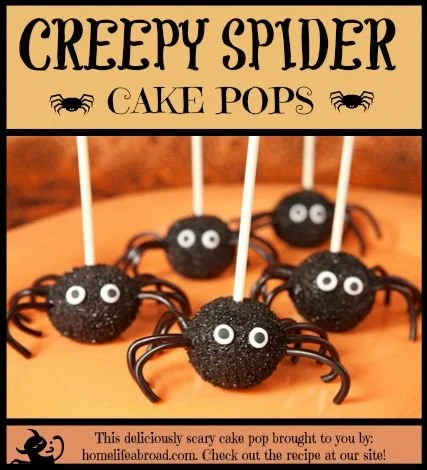
Creepy, Crawly, Delicious Spider Cake Pops are a fun and festive treat perfect for any Halloween celebration or a whimsical dessert for kids’ parties. These delightful cake pops not only look spooky but also unleash a burst of flavor that everyone will enjoy. Easy to make and incredibly cute, they’re sure to become a favorite at your next gathering.
Why You’ll Love Creepy, Crawly, Delicious Spider Cake Pops
- Simple to Make: With just a few ingredients and straightforward steps, these cake pops are beginner-friendly, making them accessible for anyone in the kitchen.
- Fun Presentation: The spider design adds an element of fun to your treats, making them a conversation starter at any gathering.
- Customizable: You can easily alter the flavor profile by choosing different cake mixes or frosting, allowing for a personal touch that suits any taste.
- Perfect for Parties: These cake pops are a hit among children and adults alike, making them an ideal addition to birthday parties, Halloween celebrations, or family gatherings.
- No Special Equipment Required: You don’t need sophisticated baking tools; just your hands and a few common kitchen supplies will do.
Recipe Overview
- Prep Time: 15 minutes
- Cook Time: 30 minutes (plus cooling time)
- Total Time: 1 hour (plus 30 minutes freezing time)
- Servings: 20 cake pops
- Difficulty Level: Easy
Ingredients You’ll Need for Creepy, Crawly, Delicious Spider Cake Pops
-
For the Cake Pops:
- 1 box of cake mix (any flavor you prefer)
- 1 can of frosting (complementary flavor to your cake)
-
For Decoration:
- Chocolate coating (such as candy melts or chocolate chips)
- Black licorice (for spider legs)
- Candy eyes
- Cake pop sticks
Notes:
- Choose a cake mix that you enjoy for the base flavor, and use a frosting that pairs well.
- Candy melts are often easier to work with than chocolate chips for coating; they melt smoothly and set well.
- If you can’t find black licorice, use chocolate or another candy to create spider legs.
How to Make Creepy, Crawly, Delicious Spider Cake Pops
-
Bake the Cake: Prepare the cake according to the package instructions. Once baked, let it cool completely in the pan.
-
Crumble the Cake: After cooling, crumble the cake into a large mixing bowl. Aim for an even texture without large chunks.
-
Mix with Frosting: Add the can of frosting to your crumbled cake. Use your hands or a spatula to mix until everything is fully combined and holds together.
-
Form the Cake Pops: Scoop small amounts of the mixture and roll them into balls about 1 inch in diameter. Insert a cake pop stick into each ball gently but firmly.
-
Freeze the Pops: Place the formed cake pops in the freezer for about 30 minutes to firm up. This will help them hold their shape during the dipping process.
-
Melt the Chocolate Coating: In a microwave or double boiler, melt the chocolate coating according to the package instructions until smooth.
-
Dip the Pops: Carefully dip each cake pop into the melted chocolate, ensuring it’s fully coated. Let any excess chocolate drip off back into the bowl.
-
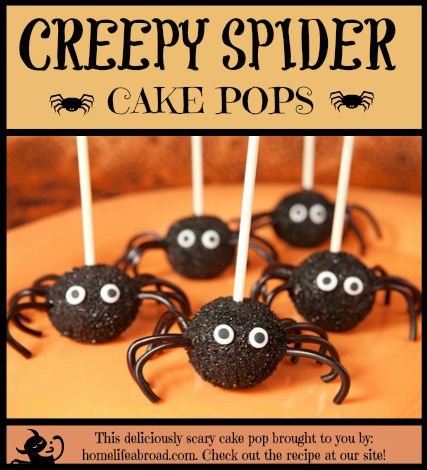
Decorate: Place the coated cake pops on a lined baking sheet. Before the chocolate sets, attach black licorice pieces for legs and press on candy eyes to create the spider.
-
Final Cooling: Allow the pops to cool completely and the chocolate to harden before serving.
Tips for Success
- Make sure your cake is completely cool before crumbling; warm cake can lead to a gooey texture.
- If the mixture is too dry, add a little more frosting until it holds together. If it’s too moist, add more cake.
- When dipping, twirl the pop as you pull it out of the chocolate to avoid drips.
- Use a fork to help manage excess chocolate on the pops for an even coat.
- If your chocolate hardens while you’re working, gently reheat it for a few seconds until it softens again.
Easy Variations
- Different Cake Flavors: Experiment with chocolate, vanilla, or even red velvet cake for unique flavors.
- Frosting Swaps: Try cream cheese frosting for a tangy twist or a flavored buttercream to jazz things up.
- Alternative Decorations: Use colored candy melts for a festive look or find different candies, like gummy worms, to create different creepy designs.
- Healthy Version: Swap the cake mix for a whole-wheat version or a gluten-free cake mix and use natural frosting without added sugars.
- Mini Pops: Make them smaller by rolling tiny balls; these make great bite-sized treats for parties.
What to Serve with Creepy, Crawly, Delicious Spider Cake Pops
- Hot Cocoa: A warm beverage complements the treats and balances the sweetness beautifully.
- Fruit Platter: Offer a variety of cut fruits like apples and grapes for guests seeking a lighter option.
- Scary Snacks Platter: Serve alongside ghost-shaped sandwiches or spooky pumpkin muffins for a complete Halloween spread.
- Ice Cream: An ice cream scoop is a fantastic pairing—create your own dessert sundaes using a cake pop as a topping.
Storage and Reheating
- Refrigerator Storage: Store leftover cake pops in an airtight container in the fridge for up to a week.
- Freezer Storage: For longer storage, wrap them individually in plastic wrap and place them in a freezer-safe container for up to three months.
- Best Reheating Method: If you need to soften a frozen pop, let it sit at room temperature for 15–20 minutes before enjoying.
- Preserving Texture: Coat them again in melted chocolate when serving after freezing to retain the outer crunch.
Common Mistakes to Avoid
- Overloading on Frosting: Too much frosting can make the mixture too sticky and difficult to shape.
- Not Freezing Long Enough: Failing to freeze the pops sufficiently can lead to them falling apart when dipped in chocolate.
- Not Allowing Excess Chocolate to Drip Off: Failing to let excess coating drip can lead to a gloppy finish.
- Using Too Hot Chocolate: If the chocolate is too hot, it could melt the cake pop when dipped, leading to messy results.
Creepy, Crawly, Delicious Spider Cake Pops: Background & Cultural Inspiration
Cake pops have evolved from simple desserts into playful confections that capture the imagination. As a classic treat with versatile flavors, their form allows for creativity, especially during festive times like Halloween. Spider Cake Pops embody the spirit of Halloween, combining the fun of baking with traditional charm. This dessert encourages families to gather and create, turning kitchen time into cherished memories. Whether you’re decorating for a birthday or a spooky holiday, these cake pops can seamlessly fit any occasion.
Frequently Asked Questions
Can I use any flavor of cake mix?
Yes! Choose a cake mix that you enjoy, as the flavor will carry through once baked and mixed with frosting.
How should I store leftover cake pops?
Keep them in an airtight container in the fridge for about a week or freeze them for longer enjoyment.
Can I make these cake pops ahead of time?
Absolutely! You can prepare the cake pops a day or two in advance. Just keep them properly stored to retain freshness.
What if my chocolate coating isn’t smooth?
If your chocolate is clumpy or difficult to work with, it may have overheated. Try adding a teaspoon of coconut oil to help smooth it out.
Do I need to use black licorice for the legs?
No, you can use any dark candy or chocolate to create spider legs. Use your creativity to make them fun!
Final Thoughts
Creepy, Crawly, Delicious Spider Cake Pops are a delightful way to celebrate occasions with a touch of whimsy. Easy to prepare and customize, these cake pops not only satisfy your sweet tooth but also bring joy and fun to any party. Treat your family and friends to these charming treats, and enjoy the smiles they create! Happy baking!
PrintCreepy, Crawly, Delicious Spider Cake Pops
Fun and festive cake pops designed to look like spiders, perfect for Halloween or kids’ parties.
- Prep Time: 15 minutes
- Cook Time: 30 minutes
- Total Time: 90 minutes
- Yield: 20 cake pops
- Category: Dessert
- Method: Freezing
- Cuisine: American
- Diet: Vegetarian
Ingredients
- 1 box of cake mix (any flavor you prefer)
- 1 can of frosting (complementary flavor to your cake)
- Chocolate coating (such as candy melts or chocolate chips)
- Black licorice (for spider legs)
- Candy eyes
- Cake pop sticks
Instructions
- Bake the cake according to the package instructions. Once baked, let it cool completely in the pan.
- Crumble the cake into a large mixing bowl. Aim for an even texture without large chunks.
- Mix the can of frosting with your crumbled cake until fully combined and holds together.
- Form small balls about 1 inch in diameter from the mixture and insert a cake pop stick into each ball gently.
- Freeze the formed cake pops for about 30 minutes to firm up.
- Melt the chocolate coating until smooth according to the package instructions.
- Dip each cake pop into the melted chocolate, ensuring it’s fully coated.
- Decorate with black licorice pieces for legs and press on candy eyes.
- Cool completely before serving.
Notes
Candy melts are easier to work with than chocolate chips. Substitute black licorice with chocolate or another candy if needed.












