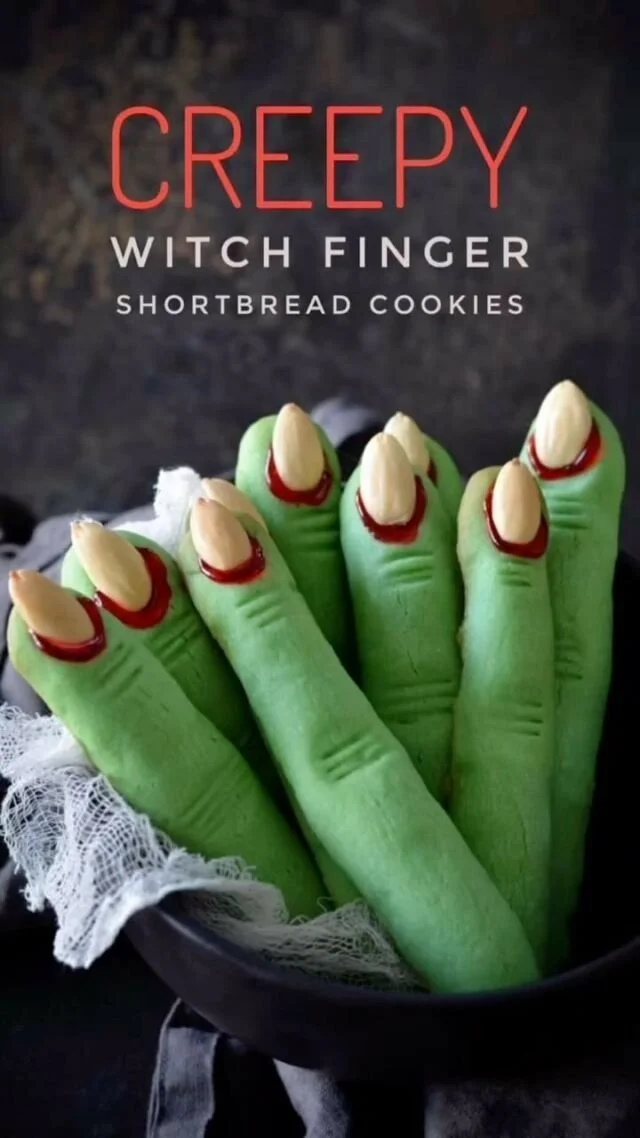
Creepy Witch Finger Cookies are a fun and spooky treat perfect for Halloween or any creepy-themed gathering. These cookies combine a buttery flavor with a unique appearance that will delight both children and adults alike. With just a few ingredients and simple steps, you can create a festive dessert that adds a touch of fright to your celebrations.
Why You’ll Love Creepy Witch Finger Cookies
- Fun and Festive: These cookies are designed to look like witch’s fingers, making them a fun treat for Halloween parties or spooky-themed events.
- Easy to Make: With only a few simple ingredients and straightforward instructions, even beginner bakers can whip up a batch with confidence.
- Customizable Appearance: You can get creative with the decoration, adjusting the level of “spookiness” based on your audience.
- Perfect for Kids: Kids love the playful idea behind these cookies, and they can even help shape the fingers or add the almonds.
- Delicious Flavor: Buttery and slightly sweet, these cookies deliver on taste while still being visually striking.
Recipe Overview
- Prep Time: 15 minutes
- Cook Time: 20-25 minutes
- Total Time: 40 minutes
- Servings: 24 cookies
- Difficulty Level: Easy
Ingredients You’ll Need for Creepy Witch Finger Cookies
- 1 cup unsalted butter, softened
- 1 cup powdered sugar
- 1 teaspoon vanilla extract
- 2 1/4 cups all-purpose flour
- 1/2 teaspoon salt
- 1 teaspoon almond extract
- Whole almonds (for fingernails)
- Red food coloring (optional, for added effect)
These ingredients create a rich, buttery dough that’s easy to work with. If you’re looking for substitutions, you can replace the almond extract with more vanilla extract for a different flavor, or use vegan butter for a dairy-free option.

here
How to Make Creepy Witch Finger Cookies
-
Preheat the Oven
Preheat your oven to 325°F (163°C). This temperature is ideal for baking cookies to a golden finish. -
Cream the Butter and Sugar
In a mixing bowl, cream together the softened butter and powdered sugar until the mixture is smooth and fluffy. This should take about 2-3 minutes. -
Add Extracts
Mix in the vanilla extract and almond extract. The almond extract gives these cookies a delicious nutty flavor. -
Combine Dry Ingredients
Gradually add the flour and salt to the butter-sugar mixture. Mix until everything is well combined, forming a soft dough. -
Shape the Fingers
Take small amounts of dough and shape them into finger shapes, tapering one end to create a pointed tip. Press an almond into the tapered end to resemble a fingernail. -
Add the Bloody Effect (Optional)
If you want to create a bloody effect, use a toothpick to add red food coloring at the base of the almond, making it look like a spooky witch’s finger. -
Bake the Cookies
Place your cookies on a baking sheet lined with parchment paper. Bake for about 20-25 minutes, or until they are lightly golden on the edges. -
Cool Before Serving
Let the cookies cool on a wire rack for a few minutes before serving. Enjoy them while they’re fresh and spooky!
Tips for Success
- Butter Softness: Ensure your butter is softened but not melted; this helps achieve a light texture.
- Dough Consistency: The dough should be soft yet firm enough to hold shape. If it feels too sticky, chill it for 15-20 minutes.
- Uniform Size: Try to shape each cookie uniformly to ensure even baking.
- Decorative Touches: Feel free to experiment with decorations, adding chocolate chips or edible glitter for a more festive look.
Easy Variations
- Chocolate-Dipped Fingers: Dip the ends in melted chocolate for a delicious twist.
- Different Nuts: Use pecans or walnuts instead of almonds for different flavors or textures.
- Spice It Up: Add a teaspoon of ground cinnamon to the dough for a warming flavor.
- Dairy-Free: Substitute the butter with vegan butter and use dairy-free powdered sugar.
What to Serve with Creepy Witch Finger Cookies
- Pumpkin Spice Latte: The spices in this coffee compliment the cookies perfectly for a festive treat.
- Hot Chocolate: Serve these cookies with a warm cup of hot chocolate for a cozy evening.
- Halloween Punch: A fruity punch can balance the sweetness of the cookies and keep your party lively.
- Ghostly Cupcakes: Pair these cookies with light-colored cupcakes topped with ghostly meringue for a fun dessert table.
Storage and Reheating
- Refrigerator Storage: Store cookies in an airtight container in the fridge for up to a week.
- Freezer Storage: Freeze the baked cookies for up to 3 months. Wrap them tightly to prevent freezer burn.
- Reheating Method: To soften cookies, let them sit at room temperature for about 15 minutes after removing from the fridge or microwave for 10 seconds.
- Meal Prep Note: You can prepare the dough ahead of time and freeze it. Just shape the cookies and bake when you’re ready.
Common Mistakes to Avoid
- Overbaking: Watch the cookies closely in the oven; they should be just lightly golden and not dark brown.
- Too Much Flour: Make sure to measure flour accurately. Adding too much can lead to tough cookies.
- Skipping the Cooling Step: Allowing cookies to cool on a wire rack helps them maintain the right texture and prevents them from becoming soggy.
Creepy Witch Finger Cookies: Background & Cultural Inspiration
Creepy Witch Finger Cookies often make appearances in Halloween-themed celebrations and festive gatherings. Their eerie resemblance to fingers ties into Halloween traditions of spookiness and fun. These cookies can serve as a playful nod to classic horror tales, where witches are often depicted with long, unsettling fingers. They also encourage creativity, as people can customize them with different decorations. Originating from playful Halloween spirit, they’ve become a staple in holiday baking, delighting children and adults alike.
Frequently Asked Questions
Can I make the dough ahead of time?
Yes, you can prepare the dough and refrigerate it for up to 3 days before baking.
What can I substitute for almond extract?
You can use additional vanilla extract or omit it altogether for a different flavor.
How do I store leftover cookies?
Store them in an airtight container at room temperature for 4-5 days, or refrigerate for longer freshness.
Can I decorate these cookies differently?
Absolutely! You can use icing, sprinkles, or melted chocolate to create different designs.
What happens if my dough is too dry?
If the dough seems too dry, add a teaspoon of milk or water to help bring it together.
Final Thoughts
Creepy Witch Finger Cookies are not only easy to make but also provide a playful twist to your Halloween festivities. They bring a delightful combination of flavor and fright that will be a hit at any gathering. With simple ingredients and straightforward steps, these cookies are definitely worth trying this season. Get ready to impress your friends and family, and enjoy a few spooky treats!
PrintCreepy Witch Finger Cookies

A fun and spooky treat perfect for Halloween gatherings, these buttery cookies are designed to look like witch’s fingers, making them a delightful addition to any celebration.
- Prep Time: 15 minutes
- Cook Time: 25 minutes
- Total Time: 40 minutes
- Yield: 24 cookies
- Category: Dessert
- Method: Baking
- Cuisine: American
- Diet: Vegetarian
Ingredients
- 1 cup unsalted butter, softened
- 1 cup powdered sugar
- 1 teaspoon vanilla extract
- 2 1/4 cups all-purpose flour
- 1/2 teaspoon salt
- 1 teaspoon almond extract
- Whole almonds (for fingernails)
- Red food coloring (optional, for added effect)
Instructions
- Preheat your oven to 325°F (163°C).
- Cream together the softened butter and powdered sugar until smooth and fluffy.
- Mix in the vanilla extract and almond extract.
- Gradually add the flour and salt, mixing until you form a soft dough.
- Take small amounts of dough and shape them into finger shapes, tapering one end.
- Press an almond into the tapered end to resemble a fingernail.
- If desired, use a toothpick to add red food coloring at the base of the almond for a bloody effect.
- Bake for about 20-25 minutes until lightly golden on the edges.
- Let cool on a wire rack before serving.
Notes
Ensure your butter is softened but not melted for the best texture. Experiment with decorations to customize the cookies.












