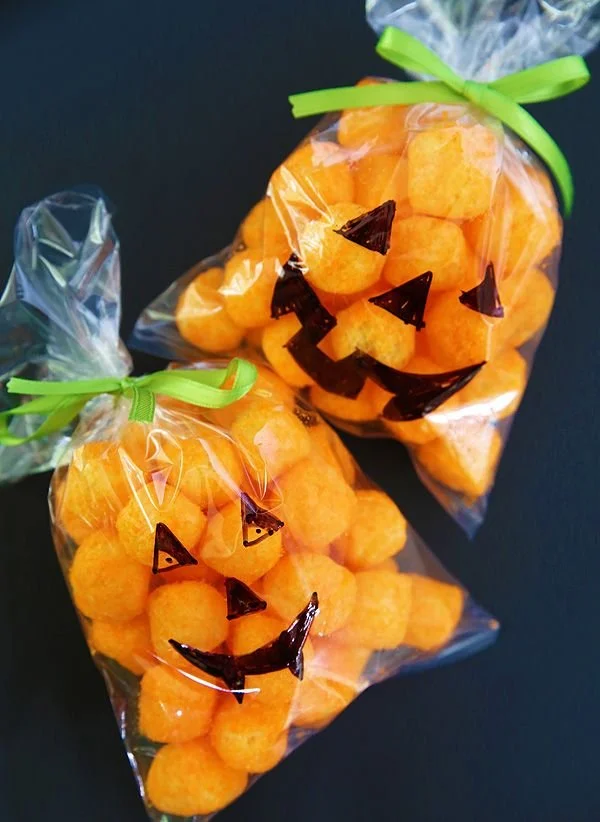
Get ready for some crafty fun with these easy Halloween Classroom Treats. These adorable pumpkin treat bags are perfect for sharing during Halloween celebrations. Not only are they simple to make, but they also add a personal touch that kids will love. Let’s dive into how you can create these festive bags filled with goodies!
Why You’ll Love Easy Halloween Classroom Treats
- Simple Crafting: This project requires minimal supplies and is easy for kids to participate in. Even beginners can handle it!
- Customizable: You can fill these bags with your choice of treats, making them suitable for various dietary preferences.
- Festive Presentation: The bright orange bags paired with green leaves create a fun and festive look that’s sure to excite children.
- Interactive Activity: It’s a fun craft project that allows kids to get creative, whether by drawing faces or selecting their favorite candies.
- Perfect for Sharing: These treat bags are a great way to share Halloween spirit with classmates or friends and can even serve as party favors.
Recipe Overview
- Prep Time: 15 minutes
- Cook Time: 0 minutes (no cooking involved)
- Total Time: 15 minutes
- Servings: 10 treat bags
- Difficulty Level: Easy
Ingredients You’ll Need for Easy Halloween Classroom Treats
- Orange paper bags: These will serve as the base of your pumpkin treat bags.
- Green tissue paper or leaves: For the pumpkin tops.
- Scissors: To cut out leaf shapes.
- Glue: To attach the leaves to the bags.
- Markers (black): For drawing faces on the bags if desired.
- Candy or treats: Your choice of sweets to fill the bags.

How to Make Easy Halloween Classroom Treats
- Prepare the Bags: Take the orange paper bags and fill them with your choice of candy or treats.
- Cut Out Leaves: Cut out leaf shapes from the green tissue paper or use real leaves and glue them to the top of the bag.
- Personalize: Use the markers to draw faces on the bags if desired. Get creative with different expressions!
- Seal the Bags: Tie the bags shut with string or fold the top over and secure it with glue.
- Ready to Share: Your pumpkin treat bags are ready for Halloween fun!
Tips for Success
- Choosing Treats: Opt for treats that won’t melt easily, such as hard candies or packaged snacks, to ensure they stay fresh.
- Craft Organization: Set up a crafting station to keep everything organized. Separate your ingredients for easy access.
- Involve Kids: Encourage children to help with each step. They can fill the bags, draw faces, and even cut the leaves (with supervision).
- Keep It Fun: Use various colors or shapes for the faces to make each bag unique and allow kids to express their creativity.
- Test Glue: If using glue, ensure it’s strong enough to keep leaves attached but not too liquidy, as it might spill into the treat bags.
Easy Variations
- Theme It Up: Use different colored paper bags for another holiday—such as red for Christmas or pink for Valentine’s Day.
- Different Fillings: Instead of candy, you can fill the bags with small toys, stickers, or homemade treats.
- Spooky Faces: Draw spooky or fun designs using colored markers for added flair.
- Nature Craft: Use fallen leaves or other natural elements like small pinecones to enhance the pumpkin theme.
- Personalized Messages: Attach little notes to each bag instead of drawing faces, making them more personal for each recipient.
What to Serve with Easy Halloween Classroom Treats
- Apple Slices: Fresh, crunchy apple slices make a perfect balance to the sweetness of the treats.
- Popcorn: A savory option that can be dressed up with seasoning to contrast with the sweetness of the bags.
- Cheese Sticks: Individually wrapped cheese sticks offer a protein-packed addition to this sweet treat.
- Mini Cupcakes: Sweet, bite-sized servings that complement the festive holiday theme.
- Fruit Cups: Small fruit cups can provide a refreshing, healthy contrast to the sugary treats.
Storage and Reheating
- Refrigerator Storage: Keep the filled treat bags in the fridge if you intend to store them for more than a day. They’ll stay fresh longer.
- Freezer Storage: It’s not typical to freeze these bags since they contain candy, but if you use homemade treats, make sure they are well sealed before freezing.
- Best Reheating Method: Not applicable for this recipe as it involves no cooking.
- Preserve Texture: Keep bags upright to maintain their form and avoid squishing.
- Meal Prep Note: You can prepare the bags without filling them a few days in advance, making assembly quicker when needed.
Common Mistakes to Avoid
- Overfilling Bags: Avoid overstuffing the treat bags, which can lead to tearing or difficulty sealing.
- Using Heavy Items: Steer clear of heavy treats which might cause bags to break.
- Not Securing the Top: Make sure to secure the top snugly; left open, items can spill out easily.
- Lack of Supervision: When children are using scissors or glue, always supervise them to ensure safety.
- Ignoring Drying Time: If using wet glue, give it time to dry properly before handling the bags.
Easy Halloween Classroom Treats: Background & Cultural Inspiration
Creating treat bags for Halloween is a popular tradition observed in many cultures, particularly in the United States. The act of trick-or-treating dates back to ancient Celtic festivals where people would wear costumes to ward off spirits. In modern times, this has evolved into a fun and inclusive way for kids to collect goodies from neighbors. The pumpkin symbolizes harvest and has deep roots in American culture, stemming from the tradition of carving jack-o’-lanterns from pumpkins. By crafting these treat bags, we celebrate community and creativity during this festive season.
Frequently Asked Questions
Can I use different colors of paper bags?
Absolutely! Using a variety of colored bags can add diversity and fun to your Halloween classroom treats.
What can I fill the bags with, besides candy?
You can fill the bags with small toys, stickers, or even baked treats, making them apt for those with different dietary preferences.
How long will the treat bags stay fresh?
If filled with candy, the bags can last up to a week if stored correctly. If using homemade treats, consider their shelf life.
Can I make these bags ahead of time?
Yes, you can prepare the bags in advance! Just keep the filled bags sealed and store them properly to maintain freshness.
What if I don’t have glue for the leaves?
You can use tape as a quick alternative to glue for attaching the leaves to the bags.
Final Thoughts
Easy Halloween Classroom Treats are not just a delightful way to celebrate the season; they also offer a wonderful opportunity for creativity and community. This simple craft is not only enjoyable but also encourages sharing and connection among kids. So gather your supplies, invite your little ones to help, and enjoy the festive spirit of Halloween with these charming pumpkin treat bags!












