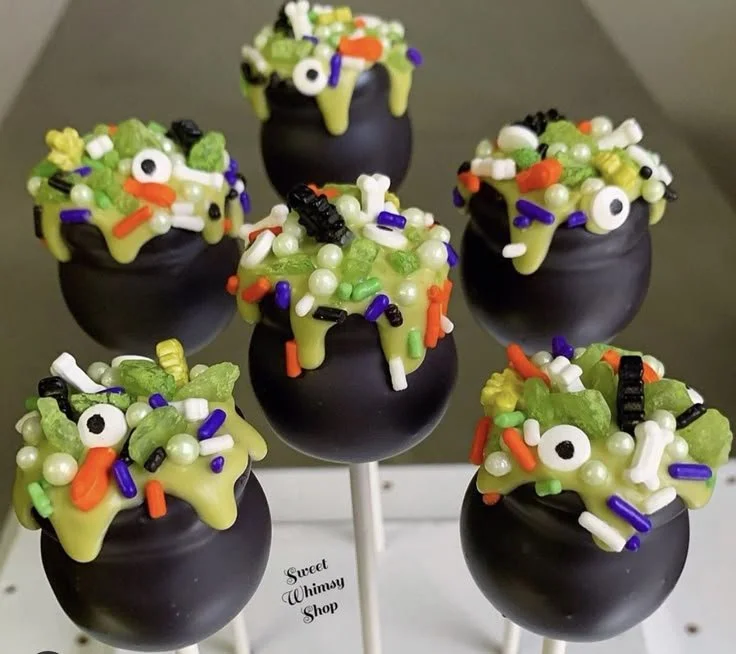
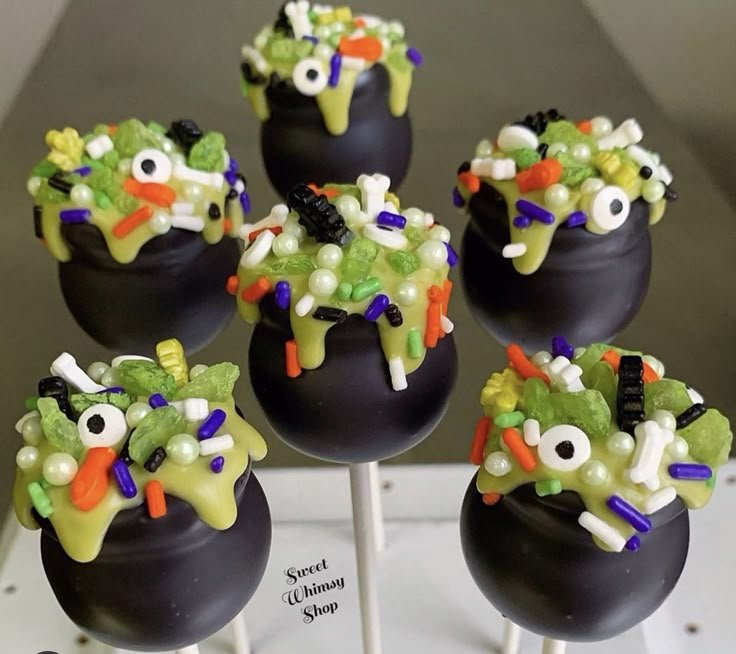
The recipe for Halloween Cake Pops is a delightful way to celebrate the spooky season with a treat that’s both fun and easy to make. These cake pops are perfect for parties, gatherings, or simply to indulge in some festive baking. With their adorable shapes and vibrant colors, they not only please the taste buds but also make for fantastic Halloween decorations.
Why You’ll Love Halloween Cake Pops
- Fun to Make: Crafting these cake pops is a fun activity for both kids and adults, making it a great family bonding experience.
- Customizable Designs: You can decorate them in countless ways to match your party theme, from ghosts to pumpkins and witches—let your creativity shine!
- Portable Treats: Cake pops are easy to transport, making them perfect for parties and potlucks. Just pop them in a container, and you’re ready to go!
- Deliciously Decadent: They offer a rich cake experience in a bite-sized format, allowing for a mix of flavors and textures in every bite.
- Great for Leftover Cake: If you have leftover cake hanging around, this recipe is an inventive way to turn it into something magical rather than letting it go to waste.
Recipe Overview
- Prep Time: 30 minutes
- Cook Time: 15 minutes (plus cooling time)
- Total Time: 2 hours (including cooling)
- Servings: Approximately 12 cake pops
- Difficulty Level: Easy
Ingredients You’ll Need for Halloween Cake Pops
-
For the Cake:
- 1 1/2 cups all-purpose flour
- 1 cup granulated sugar
- 1/2 cup unsweetened cocoa powder
- 1 teaspoon baking powder
- 1/2 teaspoon baking soda
- 1/4 teaspoon salt
- 1/2 cup milk (whole or almond milk)
- 1/4 cup vegetable oil
- 1 large egg
- 1 teaspoon vanilla extract
-
For the Frosting:
- 1/2 cup unsweetened cocoa powder
- 1/2 cup butter, softened
- 2 cups powdered sugar
- 2 tablespoons milk
-
For the Decoration:
- 12 candy melts (orange, purple, or white)
- Sprinkles (Halloween-themed)
- Lollipop sticks or cake pop sticks
- Optional: Edible markers for details
How to Make Halloween Cake Pops
-
Prepare the Cake Batter:
In a large bowl, combine the flour, sugar, cocoa powder, baking powder, baking soda, and salt. Mix well. In a separate bowl, whisk together the milk, vegetable oil, egg, and vanilla extract. Gradually add the wet ingredients to the dry ingredients, mixing until combined. -
Bake the Cake:
Preheat your oven to 350°F (175°C). Pour the cake batter into a greased 8-inch round baking pan. Bake for 15 minutes or until a toothpick inserted in the center comes out clean. Allow the cake to cool completely in the pan before transferring to a wire rack. -
Crumble the Cake:
Once the cake is cool, crumble it into a large bowl using your hands until it resembles fine crumbs. This step is crucial for forming the pops. -
Mix in the Frosting:
In a separate bowl, beat together the cocoa powder, softened butter, powdered sugar, and milk until smooth. Mix this frosting into the cake crumbs until well combined. The mixture should be moist enough to hold together without crumbling. -
Form the Cake Balls:
Take small amounts of the mixture and roll them into balls about 1 inch in diameter. Place the balls on a baking sheet lined with parchment paper. Once done, refrigerate for at least 30 minutes to help them firm up. -
Melt the Candy Coating:
In a microwave-safe bowl, melt the candy melts according to package instructions, stirring until smooth. -
Attach the Sticks:
Dip the tip of each lollipop stick into the melted candy coating, then insert it into a chilled cake ball. This helps to secure the stick in place. -
Coat the Cake Pops:
Once all the cake balls have sticks, dip each one into the melted candy coating, allowing the excess to drip off. You can twirl them gently for an even coat. -
Decorate:
Before the candy coating sets, sprinkle with Halloween-themed decorations like sprinkles or edible glitter. Place the pops upright in a cake pop stand or a block of foam to set. -
Enjoy!:
Allow the pops to cool completely before serving. They can be stored at room temperature for several days or refrigerated.
Tips for Success
- Don’t Overmix the Batter: Overmixing can result in tough cake. Stir until just combined.
- Chill Balls Thoroughly: Properly chilling the cake balls makes for easier dipping and helps them maintain their shape.
- Use Quality Chocolate: For the candy coating, quality melting chocolates will yield better flavor and a smoother finish.
- Track Doneness: Always check for doneness by inserting a toothpick—it should come out clean when the cake is baked.
- Adjust Consistency: If the frosting is too thick or the mixture is dry, add a splash more milk until the texture is moist but manageable.
Easy Variations
- Flavor Swaps: Try using vanilla or lemon cake instead of chocolate for a lighter option.
- Different Coatings: Instead of candy melts, you might use tempered chocolate or even yogurt coating for a different taste.
- Add Nuts or Crunchies: Mix in crushed nuts or crunchy cereal into the cake batter for added texture.
- Seasonal Flavors: Incorporate pumpkin puree and spices for a fall-themed cake pop.
- Chocolate Coating with a Twist: Try adding a bit of sea salt to the melted chocolate for a sweet-and-salty kick.
What to Serve with Halloween Cake Pops
- Spooky Punch: A grape-flavored punch or a citrus-based drink enhances the Halloween feel.
- Monster Cookies: Pair these pops with cookie treats shaped like monsters for an eye-catching dessert table.
- Fruit Skewers: Fresh fruit adds a refreshing contrast to the sweetness of the pops.
- Ghostly Cupcakes: Mini cupcakes decorated with ghost faces complement the cake pops well.
- Cheese Platter: A simple cheese platter with assorted dips provides a savory contrast.
Storage and Reheating
- Refrigerator Storage: Store leftover cake pops in an airtight container in the refrigerator for up to a week.
- Freezer Storage: Cake pops can also be frozen for up to a month. Just place them in a single layer on a baking sheet to freeze, then transfer them to a container.
- Best Reheating Method: For best results, bring cake pops to room temperature before serving. Do not microwave, as this can affect the chocolate coating.
- Preserve Texture: Avoid storing them in a humid environment as it can make the coating sticky.
- Meal Prep Note: These cake pops can be made ahead of time and frozen for quick treats during Halloween.
Common Mistakes to Avoid
- Not Cooling the Cake Properly: Ensure the cake is completely cooled before crumbling to avoid warm, mushy pops.
- Using Warm Ingredients: Make sure the melted coating isn’t too hot when dipping as it can lead to a soggy texture.
- Skipping the Chill Time: Not chilling the cake balls enough can result in them falling apart during coating.
- Overloading on Toppings: Balance is key; too many toppings can overwhelm the flavor of the cake itself.
- Improperly Sticking the Pops: Ensure the lollipop stick is securely inserted into the cake ball and the tip is coated for adhesion.
Halloween Cake Pops: Background & Cultural Inspiration
Halloween Cake Pops reflect the festive spirit of Halloween, which traces its roots to ancient Celtic festivals. Originally a harvest celebration, it has evolved to encompass dressing up, trick-or-treating, and indulging in sweet treats. The incorporation of cake into pop form adds a modern twist, allowing for creativity and fun presentation. These treats fit well into the Halloween theme, with their colorful decorations capturing the essence of this spooky holiday. Additionally, they are influenced by the growing trend of cake pops that originated in the United States, gaining popularity for their versatility and visual appeal.
Frequently Asked Questions
Can I use a cake mix instead of homemade cake?
Yes, for convenience, feel free to use a boxed cake mix. Just follow the package instructions.
How long can I store the cake pops?
Cake pops can be stored in the refrigerator for up to a week or frozen for about a month.
Can I use other types of frosting?
Absolutely! Any type of frosting can work, but cream cheese or buttercream would be great choices.
Is it necessary to add the sticks?
While not mandatory, the sticks make handling the cake pops much easier and are part of the traditional presentation.
How can I make these healthier?
You can use whole wheat flour and reduce sugar, or try Greek yogurt as a substitute for butter in the frosting.
Final Thoughts
Making Halloween Cake Pops can transform your average Halloween celebration into a whimsical and delicious experience. They’re simple, fun to decorate, and absolutely delightful to eat. So grab your ingredients and get ready to create a spooky treat that everyone will love! Whether for a party or a cozy night in, these cake pops are worth the effort and will surely add some festive charm to your holiday festivities. Happy baking!
PrintHalloween Cake Pops
Delightful Halloween-themed cake pops that are fun and easy to make, perfect for parties or festive treats.
- Prep Time: 30 minutes
- Cook Time: 15 minutes
- Total Time: 120 minutes
- Yield: 12 cake pops
- Category: Dessert
- Method: Baking
- Cuisine: American
- Diet: Vegetarian
Ingredients
- 1 1/2 cups all-purpose flour
- 1 cup granulated sugar
- 1/2 cup unsweetened cocoa powder
- 1 teaspoon baking powder
- 1/2 teaspoon baking soda
- 1/4 teaspoon salt
- 1/2 cup milk (whole or almond milk)
- 1/4 cup vegetable oil
- 1 large egg
- 1 teaspoon vanilla extract
- 1/2 cup unsweetened cocoa powder (for frosting)
- 1/2 cup butter, softened
- 2 cups powdered sugar
- 2 tablespoons milk (for frosting)
- 12 candy melts (orange, purple, or white)
- Sprinkles (Halloween-themed)
- Lollipop sticks or cake pop sticks
- Optional: Edible markers for details
Instructions
- Prepare the cake batter: In a large bowl, combine the flour, sugar, cocoa powder, baking powder, baking soda, and salt. Mix well. In a separate bowl, whisk together the milk, vegetable oil, egg, and vanilla extract. Gradually add the wet ingredients to the dry ingredients, mixing until combined.
- Bake the cake: Preheat your oven to 350°F (175°C). Pour the cake batter into a greased 8-inch round baking pan. Bake for 15 minutes or until a toothpick inserted in the center comes out clean. Allow the cake to cool completely in the pan before transferring to a wire rack.
- Crumble the cake: Once the cake is cool, crumble it into a large bowl using your hands until it resembles fine crumbs. This step is crucial for forming the pops.
- Mix in the frosting: In a separate bowl, beat together the cocoa powder, softened butter, powdered sugar, and milk until smooth. Mix this frosting into the cake crumbs until well combined. The mixture should be moist enough to hold together without crumbling.
- Form the cake balls: Take small amounts of the mixture and roll them into balls about 1 inch in diameter. Place the balls on a baking sheet lined with parchment paper. Once done, refrigerate for at least 30 minutes to help them firm up.
- Melt the candy coating: In a microwave-safe bowl, melt the candy melts according to package instructions, stirring until smooth.
- Attach the sticks: Dip the tip of each lollipop stick into the melted candy coating, then insert it into a chilled cake ball. This helps to secure the stick in place.
- Coat the cake pops: Once all the cake balls have sticks, dip each one into the melted candy coating, allowing the excess to drip off. You can twirl them gently for an even coat.
- Decorate: Before the candy coating sets, sprinkle with Halloween-themed decorations like sprinkles or edible glitter. Place the pops upright in a cake pop stand or a block of foam to set.
- Enjoy! Allow the pops to cool completely before serving. They can be stored at room temperature for several days or refrigerated.
Notes
Don’t overmix the batter, and ensure the cake is cooled before crumbling. Cake pops can be frozen for up to a month.












