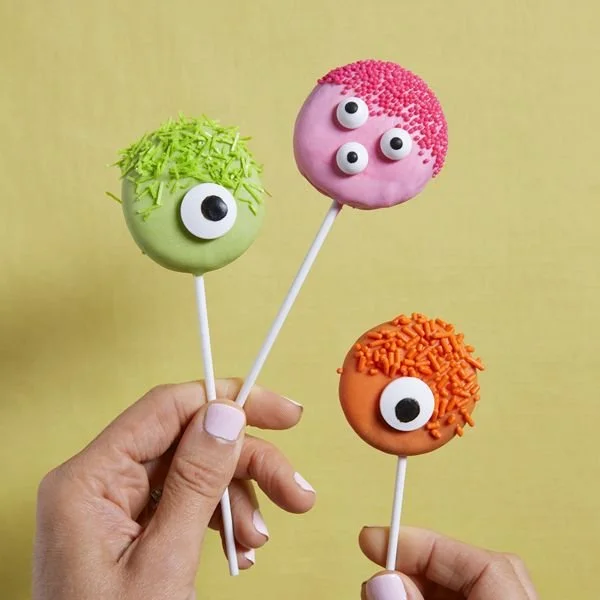
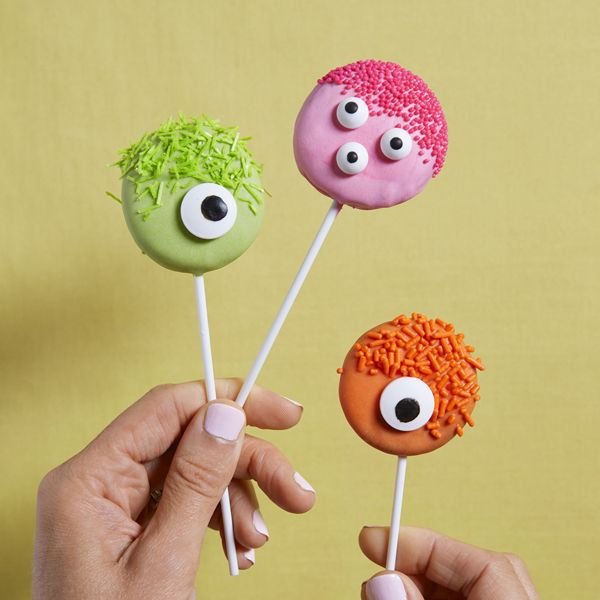
Creating Play with Your Food: Halloween Cookie Pops is a delightful way to celebrate the spooky season with fun, edible crafts. This recipe combines whimsical cookie shapes with festive decorations, making it perfect for kids and adults alike. With just a few ingredients and simple steps, you can create cookie pops that are as tasty as they are entertaining.
Why You’ll Love Play with Your Food: Halloween Cookie Pops
- Fun for All Ages: These cookie pops engage both kids and adults, transforming baking into a playful activity that everyone can enjoy together.
- Customization: You can shape and decorate these cookies in countless spooky designs, making them unique to your celebration.
- Quick and Easy: With pre-made sugar cookie dough, these treats come together swiftly, allowing you to focus on the fun of decorating.
- Perfect for Parties: Whether for Halloween gatherings or school events, these cookie pops make eye-catching treats that are easy to share.
- Creative Outlet: Decorating the cookies offers a chance to unleash your creativity, turning simple baking into a festive art project.
Recipe Overview
- Prep Time: 15 minutes
- Cook Time: 10-12 minutes
- Total Time: 30 minutes
- Servings: About 12 pops
- Difficulty Level: Easy
Ingredients You’ll Need for Play with Your Food: Halloween Cookie Pops
- 1 package of sugar cookie dough
- 1 cup of white chocolate chips
- Food coloring (for decorating)
- Candy eyes
- Lollipop sticks
- Sprinkles (optional)
Notes:
- Sugar Cookie Dough: Ready-made dough saves time and ensures a consistent taste and texture.
- White Chocolate Chips: Melting chocolate adds sweetness and a smooth finish to your pops.
- Food Coloring: This allows you to match your decorations to your Halloween theme.
- Sprinkles: These are optional but can add extra color and texture to the finished cookie pops.
How to Make Play with Your Food: Halloween Cookie Pops
1. Preheat the Oven
Preheat your oven according to the sugar cookie dough package instructions for the best results.
2. Roll Out the Dough
Roll out the sugar cookie dough on a lightly floured surface. Use cookie cutters to cut the dough into fun spooky shapes like bats, pumpkins, or ghosts.
3. Insert Lollipop Sticks
Carefully place a lollipop stick into the center of each cookie shape before baking to create the pops.
4. Bake the Cookies
Bake the cookies according to the dough package instructions. Once done, let them cool completely on a wire rack.
5. Melt the Chocolate
While the cookies cool, melt the white chocolate chips in a microwave-safe bowl. Stir the chocolate until smooth, and mix in food coloring if desired.
6. Decorate the Cookies
Dip the tops of the cooled cookies into the melted chocolate to coat them. Allow any excess chocolate to drip off.
7. Add Spooky Designs
Quickly sprinkle candy eyes, sprinkles, or additional decorations onto the chocolate before it sets. Be creative with your designs!
8. Let the Chocolate Set
Set the decorated cookies aside until the chocolate hardens. Then, they’re ready to be placed in goodie bags or served at your event.
Tips for Success
- Keep Dough Chilled: If the sugar cookie dough becomes too soft while you’re working with it, pop it in the refrigerator for a few minutes to make it easier to cut and manipulate.
- Chocolate Melting: When melting chocolate, do it in short intervals (30 seconds) to avoid burning. Stir between intervals until fully melted.
- Use Various Shapes: Don’t limit yourself to traditional shapes; mix in seasonal designs like stars or leaves for added creativity.
- Great Presentation: Insert the lollipop sticks into decorative containers like jars or cups to display your cookie pops beautifully at parties.
Easy Variations
- Chocolate Cookie Dough: Substitute sugar cookie dough for chocolate cookie dough for a delicious twist.
- Different Toppings: Experiment with various toppings like crushed nuts, coconut flakes, or edible glitter.
- Nut-Free Option: Ensure that all toppings and decorations are nut-free if you’re serving children with allergies.
- Theme Variations: Change up colors for different holidays or themes, such as red and green for Christmas.
What to Serve with Play with Your Food: Halloween Cookie Pops
- Hot Chocolate: The rich flavors of hot chocolate complement the sweetness of the cookie pops, making it a wonderful pairing.
- Fruit Punch: A tangy fruit punch adds a refreshing contrast to the sweetness of the cookies.
- Halloween-Themed Snacks: Serve with spooky-themed snacks like deviled eggs or cheese platters for a well-rounded treat table.
- Milk: Classic milk pairs perfectly with cookies, balancing out the sweetness while enhancing the flavors.
Storage and Reheating
- Refrigerator Storage: Store any leftover cookie pops in an airtight container in the refrigerator for up to a week.
- Freezer Storage: For longer storage, freeze the individual cookies (without chocolate) in a single layer on a baking sheet, then transfer them to an airtight container. They can last up to three months.
- Reheating Cookies: To preserve texture, avoid reheating decorated cookies. If needed, allow them to come to room temperature before serving.
Common Mistakes to Avoid
- Overbaking Cookies: Keep an eye on the baking time to prevent cookies from becoming too hard. They should be slightly soft in the center when you take them out.
- Not Cooling Completely: Tempting as it may be, decorating warm cookies can lead to melted chocolate puddles—allow cookies to cool fully first.
- Difficult Shapes: Avoid overly intricate cut-outs that may break during baking. Stick to simple shapes for the best results.
- Neglecting to Set: Allow the chocolate to completely set before handling the cookies to avoid mess and smudging.
Play with Your Food: Halloween Cookie Pops: Background & Cultural Inspiration
Cookie decorating, particularly during Halloween, is a fun tradition that has grown in popularity over the years. The concept of using food as a playful medium dates back to ancient times, with shaped cookies symbolizing celebrations and seasonal themes. Today, cookie pops elevate this tradition, allowing for interactive fun and creativity. This activity encourages family bonding and brings festive joy to gatherings, turning simple baking into a memorable experience.
Frequently Asked Questions
Can I use gluten-free cookie dough?
Yes! Many brands offer gluten-free cookie dough that works well for this recipe.
How can I make these ahead of time?
You can prepare the cookie pops a day in advance and store them in the refrigerator. Wait to dip them in chocolate until the day of serving for the best texture.
What if I don’t have lollipop sticks?
You can skip the sticks and serve the cookies as flat cookies. They’ll still be delicious!
How do I prevent the chocolate from hardening too quickly?
Working with small batches of melted chocolate can help, as it will stay warm and pliable longer.
Can I add flavors to the chocolate?
Absolutely! Adding a drop of vanilla extract or your favorite flavored extract to the melted chocolate can enhance the taste.
Final Thoughts
Play with Your Food: Halloween Cookie Pops are a delightful and engaging way to celebrate Halloween. They’re simple enough for beginners, yet allow for creative expression that can bring joy to both children and adults. Try these fun cookie pops at your next Halloween gathering, and enjoy the laughter and creativity they inspire!
PrintPlay with Your Food: Halloween Cookie Pops
Delightful Halloween cookie pops that transform baking into a playful activity for all ages.
- Prep Time: 15 minutes
- Cook Time: 12 minutes
- Total Time: 30 minutes
- Yield: 12 pops
- Category: Dessert
- Method: Baking
- Cuisine: American
- Diet: Vegetarian
Ingredients
- 1 package of sugar cookie dough
- 1 cup of white chocolate chips
- Food coloring (for decorating)
- Candy eyes
- Lollipop sticks
- Sprinkles (optional)
Instructions
- Preheat the Oven: Preheat your oven according to the sugar cookie dough package instructions.
- Roll Out the Dough: Roll out the sugar cookie dough on a lightly floured surface and cut into spooky shapes.
- Insert Lollipop Sticks: Place a lollipop stick into each cookie shape before baking.
- Bake the Cookies: Bake according to package instructions, then cool on a wire rack.
- Melt the Chocolate: Melt white chocolate chips in a microwave-safe bowl, stirring until smooth.
- Decorate the Cookies: Dip the tops of cookies into melted chocolate, letting excess drip off.
- Add Spooky Designs: Quickly sprinkle candy eyes and other decorations onto the chocolate.
- Let the Chocolate Set: Set cookies aside until the chocolate hardens.
Notes
Use ready-made sugar cookie dough for convenience; customize decorations to match your Halloween theme.












