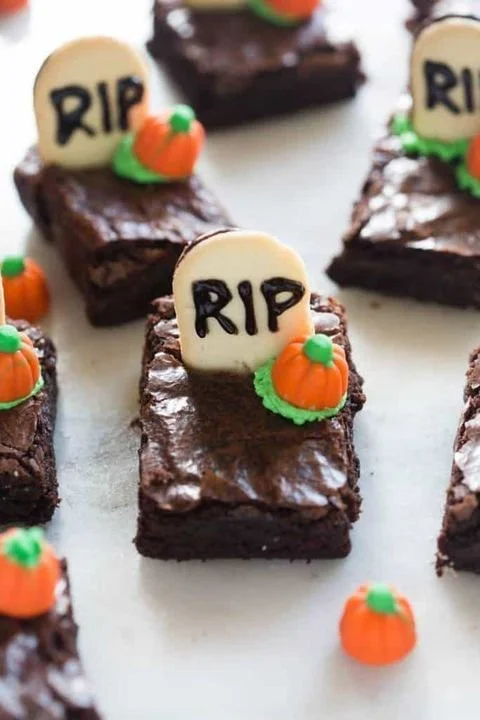
Brownies with Halloween Decorations are a delightful treat perfect for any spooky celebration. These fudgy brownies are not just easy to make but also come alive with festive decorations that will excite both kids and adults alike. The combination of rich chocolate flavor and a playful presentation makes this recipe worth trying.
Why You’ll Love Brownies with Halloween Decorations
- Festive Fun: These brownies add a spooky touch to your Halloween festivities, making them a hit at parties and gatherings.
- Simple Ingredients: You can whip up these brownies with basic pantry staples, making them budget-friendly and accessible for everyone.
- Quick to Prepare: With a straightforward process, you can bake a batch in no time, perfect for last-minute cravings or unexpected visitors.
- Customizable Decorations: Whether you want to sprinkle some edible eyes, ghosts, or pumpkins, these brownies allow you to unleash your creativity with Halloween-themed toppers.
- Chewy and Fudgy: The texture of these brownies is wonderfully fudgy, creating a satisfying chocolate experience that will have everyone coming back for seconds.
Recipe Overview
- Prep Time: 15 minutes
- Cook Time: 20-25 minutes
- Total Time: 35-40 minutes
- Servings: 12-16 brownies
- Difficulty Level: Easy
Ingredients You’ll Need for Brownies with Halloween Decorations
-
Wet Ingredients:
- 1 cup unsalted butter (for richness)
- 2 cups granulated sugar (to sweeten)
- 4 large eggs (binds the ingredients together)
- 1 teaspoon vanilla extract (for flavor)
-
Dry Ingredients:
- 1 cup all-purpose flour (for structure)
- 1 cup cocoa powder (for a deep chocolate flavor)
- 1/2 teaspoon salt (to enhance sweetness)
- 1/2 teaspoon baking powder (for leavening)
-
Decorations:
- Halloween-themed sprinkles or candies (to add a festive touch)
How to Make Brownies with Halloween Decorations
-
Preheat the Oven: Start by preheating your oven to 350°F (175°C). Grease a 9×13 inch baking pan to ensure your brownies come out easily.
-
Melt the Butter: In a large bowl, melt the unsalted butter in the microwave or on the stove. Stir in the granulated sugar until the mixture is smooth and well combined.
-
Add the Eggs: Mix in the eggs one at a time, ensuring that you fully incorporate each one before adding the next. This helps achieve a better texture.
-
Stir in Vanilla: Add the vanilla extract to the bowl and mix well.
-
Combine Dry Ingredients: In a separate bowl, sift together the all-purpose flour, cocoa powder, salt, and baking powder. This step ensures that there are no lumps and that the dry ingredients are well mixed.
-
Mix Wet and Dry: Gradually add the dry ingredients to the wet mixture, stirring until just combined. Be careful not to overmix; some lumps are okay.
-
Pour into Pan: Pour the brownie batter into the prepared baking pan and use a spatula to spread it evenly.
-
Bake the Brownies: Place the pan in the preheated oven and bake for 20-25 minutes. Check for doneness by inserting a toothpick into the center; it should come out with a few moist crumbs.
-
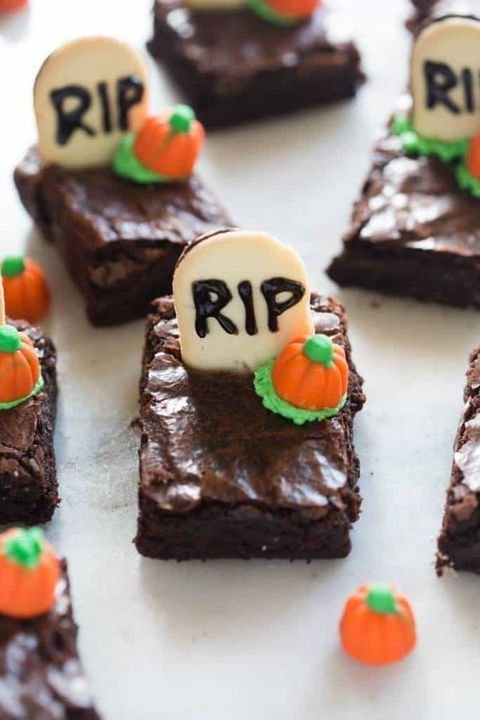
Cool and Decorate: Let the brownies cool completely in the pan before cutting into squares. Once cooled, decorate with your Halloween-themed sprinkles or candies to add a spooky flair.
Tips for Success
- Use Quality Cocoa: The flavor of your brownies heavily relies on the cocoa powder you choose, so opt for a high-quality brand for the best results.
- Avoid Overbaking: Keep a close eye on the brownies while they bake; removing them when they are slightly undercooked will ensure a fudgy texture.
- Cool Completely: Allow brownies to cool completely before cutting to prevent them from crumbling.
- Customize Sprinkle Usage: If your decorations sink into the brownies after baking, sprinkle them on top immediately after pulling them out of the oven for better adherence.
- Measure Accurately: Use the spoon and level method for measuring flour and cocoa for consistency in texture.
Easy Variations
- Nutty Brownies: Add 1 cup of chopped nuts, such as walnuts or pecans, to the batter for an added crunch.
- Peppermint Twist: Blend in peppermint extract and top with crushed candy canes for a festive holiday twist.
- Salted Caramel Brownies: Drizzle salted caramel sauce on top before decorating with sprinkles for a rich flavor contrast.
- Gluten-Free Option: Substitute all-purpose flour with a gluten-free flour blend to accommodate dietary needs.
- Frosted Brownies: After cooling, top the brownies with chocolate frosting for a decadent finish.
What to Serve with Brownies with Halloween Decorations
- Ice Cream: Serve a scoop of vanilla or pumpkin ice cream alongside for a delightful contrast to the rich brownies.
- Hot Chocolate: A warm cup of hot chocolate complements the brownies and enhances the cozy dessert experience.
- Spooky Fruit Skewers: Create fruit skewers with ghost-shaped melon pieces and add them as a fresh, playful side.
- Decorative Plates: Lay these brownies on festive Halloween-themed plates to elevate the presentation further, making them a centerpiece at your gathering.
- Whipped Cream: A dollop of whipped cream adds a light and airy texture to your plate, balancing out the fudginess of the brownies.
Storage and Reheating
- Refrigerator Storage: Store leftover brownies in an airtight container in the refrigerator for up to a week.
- Freezer Storage: You can also freeze brownies for up to three months. Wrap them tightly in plastic wrap and aluminum foil before placing them in a freezer-safe bag.
- Reheating Method: To enjoy your brownies warm, microwave them for about 10-15 seconds until heated through. This will help restore their fudgy texture.
- Preserve Texture: Avoid heating them too long to ensure they don’t dry out.
Common Mistakes to Avoid
- Incorrect Oven Temperature: Make sure your oven is correctly calibrated; an incorrect temperature can lead to either burnt or undercooked brownies.
- Neglecting to Grease the Pan: Failing to grease the pan properly can lead to brownies sticking, making it difficult to remove them.
- Overmixing the Batter: Mixing too vigorously can introduce too much air, resulting in cake-like brownies instead of fudgy ones.
- Skipping the Cooling Process: Cutting brownies while they are still warm can lead to a crumbled mess.
- Not Measuring Ingredients: Be precise with your measurements, especially for dry ingredients, to maintain the right balance in your recipe.
Brownies with Halloween Decorations: Background & Cultural Inspiration
Brownies have long been a beloved dessert in the United States, known for their rich taste and gooey texture. They emerged in the late 19th century, becoming popular for their simplicity and the ability to include various add-ins. Halloween, rooted in ancient traditions, has transformed into a holiday filled with playful treats and creative ways to celebrate. Combining Halloween themes with the classic brownie recipe allows bakers to embrace fun and creativity, making these treats accessible for various occasions, not just spooky celebrations.
Frequently Asked Questions
Can I make these brownies ahead of time?
Yes! You can prepare the brownie batter a day in advance and store it in the fridge before baking. Alternatively, baked brownies can be stored in an airtight container.
What can I use if I don’t have cocoa powder?
You can substitute cocoa powder with an equal amount of carob powder, but this will change the flavor slightly.
How can I add more chocolate flavor?
Incorporate chocolate chips or chunks into the batter before baking for extra chocolatey goodness.
Can I omit the sprinkles?
Absolutely! You can leave the sprinkles out if you prefer a simpler presentation or use any toppings you like.
Are these brownies suitable for a gluten-free diet?
You can substitute all-purpose flour with a gluten-free flour blend to make these brownies gluten-free. They’re still delicious!
Final Thoughts
Brownies with Halloween Decorations are a fantastic way to bring some festive cheer to your dessert table. The simplicity of the recipe, combined with the fun of decorating, makes it ideal for bakers of all skill levels. Whether you’re celebrating Halloween or just indulging in a sweet treat, these brownies are sure to delight. So gather your ingredients and get ready for a delightful baking adventure!
PrintBrownies with Halloween Decorations
These fudgy brownies are perfect for Halloween celebrations, featuring festive decorations that delight both kids and adults.
- Prep Time: 15 minutes
- Cook Time: 25 minutes
- Total Time: 40 minutes
- Yield: 12-16 brownies
- Category: Dessert
- Method: Baking
- Cuisine: American
- Diet: Vegetarian
Ingredients
- 1 cup unsalted butter
- 2 cups granulated sugar
- 4 large eggs
- 1 teaspoon vanilla extract
- 1 cup all-purpose flour
- 1 cup cocoa powder
- 1/2 teaspoon salt
- 1/2 teaspoon baking powder
- Halloween-themed sprinkles or candies
Instructions
- Preheat the oven to 350°F (175°C) and grease a 9×13 inch baking pan.
- Melt the unsalted butter in a large bowl and stir in the granulated sugar until smooth.
- Add the eggs one at a time, incorporating each fully before adding the next.
- Stir in the vanilla extract.
- Combine the flour, cocoa powder, salt, and baking powder in a separate bowl.
- Mix the dry ingredients into the wet mixture until just combined.
- Pour the batter into the prepared pan and spread evenly.
- Bake for 20-25 minutes, checking for doneness with a toothpick.
- Cool completely before decorating with sprinkles or candies.
Notes
Use high-quality cocoa for the best flavor. Avoid overbaking for a fudgy texture.












